
VINYL CLADDED GYPSUM CEILING
Crown Gypsum Ceiling Tile is a gypsum board base laminated with white PVC on the face side and a metallic foil film on the back side. The gypsum core manufactured according to: EN520, ASTM C 1396 M / ASTM C36 for Moisture Resistant / Regular Boards. The White PVC on the face surface is brush-able and/or washable with a mild detergent soap and damp cloth.
APPLICATIONS
Crown Gypsum Ceiling Tile product can be used in conjunction with our GTI T-24 / T-15 Grid Suspension System, where quick and easy access to any part of the false ceiling is required. Easy to clean, attractive and aesthetic surface finish, and easy to install. Use in most common areas such as toilets, bathrooms, kitchens, and service areas. Suitable for a multitude of sectors such as residential, commercial, and educational projects.
CROWN GYPSUM CEILING TILE System Components

Product Data
PVC Pattern – Difffferent Design
Shape – Square
Edge Profifile – Square
Size – 595 mm x 595 mm
Thickness – 7 mm, 9 mm, 12.5 mm
Performance
– Humidity Resistant = 95%
– High resistance to abrasion
– Light reflflectance = 75%
Raw Material
Aluminum Alloy as per ASTM B – 209 / Zinc plated. Galvanized Steel as per ASTM A653. Stainless Steel ( Brush / Mirror ).
The gypsum board complies with the following standards:
EN 520 Type A
ASTM C 36M / ASTM C 1396M
ASTM E – 84 Class A
The Suspension T-Grid with a capping face used for 600mm x 600mm aluminium, steel, vinyl or mineral fifibre tiles.
| Description | Reference/ID | Dimensions (mm) | Thickness (mm) | Leghth (mm) | Color |
| Cross Tee |
GTICT 60 GTICT 120 GTICT 60 GTICT 120 |
25 x 24 25 x 24 32 x 15 (T-15) 32 x 15(T-15) |
600 1200 600 1200 |
RAL-9003/RAL-9010 RAL-9003/RAL-9010 RAL-9003/RAL-9010 RAL-9003/RAL-9010 | |
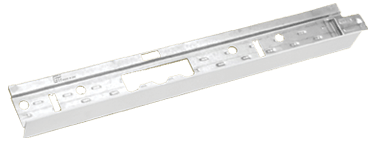
| Main Tee |
GTIMT360 GTIMT360 GTIPPGA15 |
32 x 15/24 38 x 24 19 x15 (T-15) | 0.45 |
3600 3600 |
RAL-9003/RAL-9010 RAL-9003/RAL-9010 |
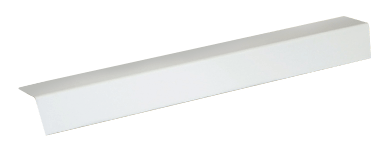
| L-Angle |
GTIPPGA20 GTIPPGA25 |
20 x 20 25 x 25 |
0.45 0.45 |
3000 3000 |
RAL-9003/RAL-9010 RAL-9003/RAL-9010 |
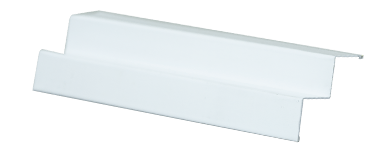
| W-Angle |
GTIWA10 GTIWA15 GTIWA20 |
A - B - C - D 19 -9- 9- 19 19 -15 -15- 19 20- 19- 19-20 |
0.45 0.45 0.45 |
3000 3000 3000 |
RAL-9003/RAL-9010 RAL-9003/RAL-9010 |
Accessories


Installation

Installation Steps
Step 1
Fixing of Suspension System
- Level marking on the wall for suspended ceiling level using accurate proper equipment.
- Ensure that all MEP fittings are installed and get approved prior to start of false ceiling installation and civil works should be finished & approved.
- Approved shop drawings shall be followed for the installation of the ceiling tiles/panels.
- The location of the suspension components shall be finalized.
- Tie Wire Anchor M6 shall be fixed to the structural soft at a space of 1200mm C/C with starting point maximum 250 mm from the wall.
- In areas where fixing of ceiling hanger is not possible due to dense MEP services, additional bridging/cross bracing shall be fixed below the services and the suspension hanger shall be hanged from it without affecting approved level
Step 2
Leveling and Fixing of Wall Angles/ Perimeter Trims
- Finished floor level marking shall be marked at several locations using leveling instrument.
- Based on available approved finished floor levels, desired false ceiling levels shall be marked on perimeter walls.
- Fix wall angles/perimeter trim on the marked line by using screws of 25mm length or concrete nails, spacing @ 300mm c/c at 100mm from the wall on both sides
Step 3
Complete the Grid
Mark the required distance intervals then proceed to fix grid suspension system Main Tee, and Cross Tee’s according to the approved layout to make 600 x 600mm grid module.
Step 4
Attached the Hanging Support
Fixing vertically Hanging Wires 3mm/4mm with Adjustable Clip connected to the soft slab using Tie Wire Anchor M6, and connected directly to the primary Main Tee.
Step 5
Opening of MEP Services
- When the suspension system is ready and the final levels are adjusted, the tiles can be fixed by laying on 600×600 module created by the grid system.
- Initially only the service tiles will be fixed so that the MEP contractors shall mark the opening for services in the ceiling tiles as per approved shop drawings allowing to cut the respective openings.
Step 6
Closing of Ceiling Tiles
- After the cutting of services openings are completed, the MEP Contractor shall install all the services as per approved layouts.
- Final clearance shall be obtained from MEP Contractor as a standard process prior to starting closing of ceiling.
- After receiving the clearance for closing of ceiling, the installed suspension system shall be checked for levels and alignment and if necessary, it shall be adjusted for final installation.
- When the suspension system is ready and fifinal levels adjusted, all the ceiling panels will be installed by laying on 600x600mm module created by already installed grid system.
Features
