
Concealed/Clip-In Ceiling System
A concealed ceiling system is probably the most widely used metal tile ceiling system, and are often suspended from the soffit. It has no visible grid and can integrate lighting, ventilation, and smoke detectors. Various acoustic requirements can also be met.
The ceiling tiles are clipped into a concealed spring tee then are automatically leveled in the grid. The robust grid system can be easily installed and tiles can be removed and replaced for access to services.
Our Concealed Clip-in Ceiling System incorporates many features to provide an economic solution to most ceiling requirements. Comprehensive ranges of the most popular sizes and perforation patterns are held in stock, together with the necessary grid components.
Applications, Features & Benefits
| APPLICATIONS | FEATURES & BENEFITS |
| Offices | Choice of tile edge detail |
| Classrooms | Standard sizes ex-stock |
| Laboratories | Ceiling takes up minimal void space |
| Hospitals | Simple downward access |
| Airports | Services easily integrated |
| Other commercial installations | Excellent fire performance |

Applications, Features & Benefits
Finish Coating / Material Standard
The coating on the tiles conform to ECCA standards and performed as per European norms: EN 1396 specifications. Aluminum alloy / temper:3005 / 3105 – H24, as per ASTM B 209 M.
Fire Classification
Class 1 Surface spread of flame as per BS 476: Part 7: 1997
Class A Surface spread of flame as per ASTM E84-16

Finish Raw Material
Surface Finish- Plain / Perforated / Decorative Face Patterns


Raw Material
Aluminum Alloy as per ASTM B – 209 / Zinc plated. Galvanized Steel as per ASTM A653. Stainless Steel ( Brush / Mirror ).
Concealed/Clip-In Ceiling System Components
Material : Galvanized Iron as per ASTM A653M/ Aluminum as per ASTM B209M Indirect Hung as per ASTM C635M/ASTM C636M

Spring Tee
Concealed Ceiling Carrier
(Spring tee) 0.45/0.5 mm thickness 3 mtr, 4 mtr Length.

Main Channel
Galvanized Iron (GI): BS EN 10346:2009
Manufacturing Standard : BS EN 10162 : 2003 / BS EN 14195 : 2005 ASTM C645 / C645 M.
Coating Type: Z120, Z180 & Z275 as per ASTM A653 /A653M.

Perimeter Channel / Edge Trim / C-Channel
“U” shaped channel fixed on the walls, edging at right angles to the panel. Color and finish to match the panel.

W – Angle (Plain/Tab)
Galvanized Steel Prepainted Polyester Coating W-Angle (Plain/Tab), same color finishing as the tiles.
RAL 9003 / 9010
| Description | Reference/ID | Dimensions (mm) | Thickness (mm) | Color |
| Plain/Perforated Aluminum | GCIT B4 | 300x600600x600600x1200 | 0.6/0.7/0.8 | RAL-9003 / RAL-9010 (Other Colors Available) |
| Spring Tee | GTIST |
3000 4000 | 0.45/0.5 | Galvanized Iron |
| Aluminum Edge Trim | GTIET38 |
3000 4000 (Custom length available) | 0.6/0.7 | RAL-9003 / RAL-9010 (Other Colors Available) |
| Main Channel GI 38 | GTIMC38 |
3000 4000 (Custom length available) | 0.45 - 1.5 | Galvanized Iron |
ACCESSORIES

Installation

Installation Steps
Step 1
Mark the wall
Using the water level or laser method, mark the desired height on the wall.
Step 2
Attach Edge Trim / U-shape or W-shape
Using screws and nails, fix the Edge Trim on the walls at the marked height.
Step 3
Complete the grid
Mark the required distance intervals then proceed to fix the suspension system using the main channel maximum spaced @ 1200mm O.C and spring Tee spaced @ 600mm O.C, connected with wire clips or screwed, according to the approved layout.
Step 4
Attach the hanging support
Fixing Hanging wires 3mm/4mm with adjustable clip and channel bracket or channel support from soffit of slab with Ceiling Clip and Cartridge or wedge anchor, connected directly to the main channel.
Step 5
Install the tiles
Clip-in the 600mm x 600mm tiles in the correct pattern
Step 6 | Cut the tiles (if necessary)
Cut apertures for lights and other services where required.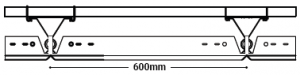
Features
